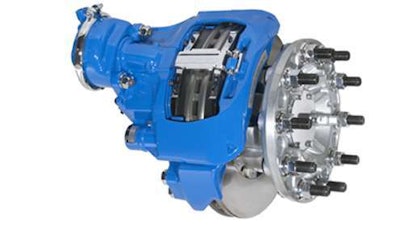
“Air disc brakes offer quick and easy pad changes – about 15 minutes once the wheel is removed – and don’t require regular lubrication,” said Kevin Pfost, Technical Services Coordinator, Bendix Spicer Foundation Brake LLC (BSFB). “Faster service times equal greater vehicle uptime, as do the longer life cycles of air disc brakes.”
Out with the Old
Prepping for an air disc brake pad change is simple in that the brakes are the same whether they are equipped on a steer, drive, or trailer axle.
If the parking brake is on, it will need to be released or caged so that the axle rotates freely.
Once the wheel is off, exposing the wheel-end, find and remove the cap covering the shear adapter on the brake caliper. Using a 10 mm socket wrench or a ratcheting box wrench on the adapter, turn the adjuster counterclockwise – a clicking noise indicates that the tappets are “backing off,” or loosening the pads’ grip on the brake rotor – until it stops. A chain connects the pair of tappets to extend and retract them simultaneously.
“It’s important never to turn the adjuster without the shear adapter installed,” Pfost noted. “The shear adapter is designed to fail in the event of over-tightening, preventing damage to the adjustment mechanism itself. The adjustment mechanism is not replaceable, so if it goes bad, the entire caliper will need to be replaced.”
Once the shear adapter is fully backed off, the brake pads can be freed for removal. A retaining bar across the top of the brake pads holds them in place: Use a small pair of pliers to remove the spring clip from the pin fastening the retaining bar, then remove the washer from the pin as well. Push down on the retaining bar, pull out the pin, and remove the pad retaining bar. The two brake pads can now be lifted out from either side of the rotor.
Take a quick look at the pads: The minimum friction thickness is about 2 mm – roughly the thickness of a nickel. Compare that with the thickness of new pads to see just how much usage you get out of air disc brake friction.
Boots, Pins, Bushings, and Seals
Before installing the new pads, take some time for a preventive maintenance inspection:
· Using the shear adapter, extend the tappets and inspect the tappet boots to make sure they are not damaged or contaminated with dirt, which can cause them to bind.
· Inspect the guide pin boots: Push the caliper all the way inboard to open up the boots and check them for damage and contamination.
· Look over the tappets, seals, and bushings.
If components are damaged, service with a genuine Bendix service kit. Use the brake manufacturer’s service data sheet to determine the right kit, which should include the components as well as any special tools to ensure that new bushings are set at the proper depth. The free Bendix On-Line Brake School courses at www.brake-school.com include a video on replacing these components.
Note that slide pin lubrication is not required: Air disc brakes are lubricated for life and do not need grease fittings or oil spray as long as the components remain uncontaminated.
In with the New
When the inspection and any component replacements are complete, make sure the tappets are fully backed off so they are flush, and slide the new brake pads down into position. They will go in only one way: with the friction facing the rotor and the pad springs at the top.
In addition to the new pads, Bendix brake pad replacement kits include pad springs, pad retaining bars, and retaining bar pins, clips, and washers. Once the new friction is installed, replace the pad retaining bar and fasten it in place with the pin, washer, and clip.
With the 10 mm socket wrench or ratcheting box wrench, turn the shear adapter clockwise to adjust the tappets until the new pads make enough contact with the rotor to stop it from free-wheeling, then back it off – counterclockwise – three clicks. Replace the cap that covers the shear adapter, and the pad replacement is complete.
“We recommend replacing the pads on the entire axle at the same time, which is why Bendix pad kits include all the parts necessary for a complete axle pad change,” Pfost said. “A fresh set of friction across the board will ensure that each brake shares an equal part of the stopping workload, which is crucial for optimal safety and performance.”
The Bendix® ADB22X™ air disc brake is available through all six major truck original equipment manufacturers, including Peterbilt®, Kenworth, Daimler Trucks North America (DTNA), Mack, Volvo, and International®. The brake has been standard equipment on the steer axle of all Peterbilt Motors Company Class 8 tractors since 2011, and on Kenworth tractors since 2013.
Bendix provides commercial fleets, technicians, and drivers with the tools they need to ensure safe operation through assessment, maintenance, and repair. The Bendix On-Line Brake School at www.brake-school.com provides access to the company’s knowledge database and technical resources on all aspects of electronics and air brake maintenance and product education. The Bendix Brake Training School, one of the industry’s longest-running training programs, has educated more than 250,000 students since its founding more than 50 years ago. Among other tools, the company offers field-tested sales and service professionals; a 100 percent ASE-certified field technical support team; and the Bendix Tech Team (at 1-800-AIR-BRAKE), an expert technical support group providing service advice, brake system troubleshooting, and product training.


